Pages

Monday, July 29, 2013


Garlic Bubble Bread


 "Don't judge a book by it's cover." It's a saying we hear all the time. When we remember it's applied to all kinds of things. Worms turn into butterflies, goslings turn into geese. Despite our efforts, we base a lot of ideas from appearances and how things look. 
My sweet friends saw this and asked how long it took to make. They were expecting for me to say hours or something ridiculous. Don't be silly, that's not really my thing. This bread is very easy and impressive. There's only four ingredients! Not to mention it is super cheesy and delicious. It tastes like a bread you would expect to get at a restaurant but a little extra special.

Ingredients

24 regular sized Rhodes dinner rolls
1/3 cup butter or olive oil ( I used half and half)
3/4 cup Parmesan Cheese
1 Tablespoon Italian Seasoning


First, thaw the rolls in the fridge or on the counter until they are soft and doughy. Combine the cheese and Italian Seasoning together.


Cut each of the rolls into four pieces. You can do this with either a knife or a pair of scissors. 


Plop 1/4 of a roll into the butter and roll it around a bit in a happy butter bath. Make sure the butter is not too hot or else it will be a gooey dough mess. Yuck!


 Roll the dough piece into the cheese and seasoning mix then place it into a pan. You can use any kind you like, just make sure there's enough room for the rolls to double in size. I like to use a 9 in spring form pan. It's easy to get out and pretty.


Just the the dough in there all willy nilly, it won't matter!Once all the dough pieces have been put into the pan, you should have some oil/ butter and cheese leftover. I sprinkled and drizzled both of these over the top to make sure each bite was super tasty. 


Let the dough rise until it is at least double in size, it should take about an hour or two. They look like little cheese pillows made for a delicious night of sleep!


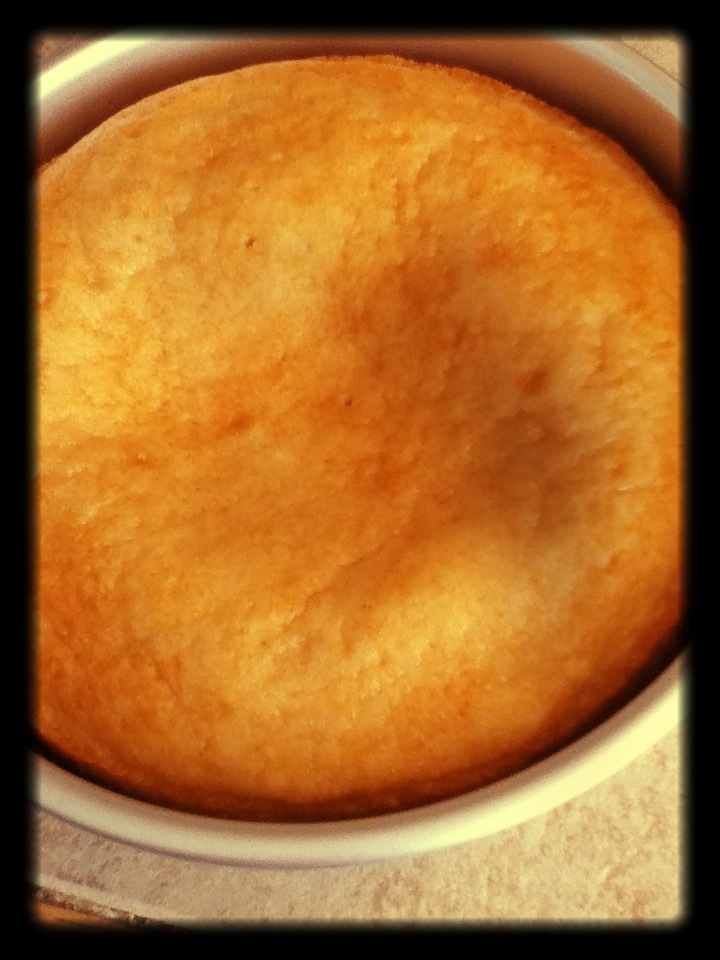
Bake the bread for about 30 to 40 minutes in a 350 degree oven until the top is golden brown. 


Once the bread has cooled a bit, pop it out of the pan and onto a pretty plate. I like to add an extra drizzle of butter and Italian Seasoning for presenting it. Don't be afraid of this bread's pretty appearance, it is super easy!


Monday, July 15, 2013


 Summer Peach Cake


 I walked into the grocery store the other day and I was overcome by a smell from the produce department. Overcome in a good way I mean. Peaches were not on my shopping list but the fragrance made it difficult to stop myself from dumping a whole barrel into my cart. In my head it seemed like a great idea to buy 15 peaches, they were on sale after all. Once I got them home and ate around 5 of them and I decided it would be wrong to have this many peaches and not make a scrumptious dessert out of them. I'm pretty sure this is what peaches dream of becoming when they grow up anyway. 

This is a fabulous dessert to make with any stone fruit. Peaches, plums, apricots are all perfect with this cake baked over the top. It's also a pretty dessert that people love despite the small amount of effort on your part. 

Ingredients

3/4 cup sugar
1/2 cup milk
1/4 vegetable oil
1 egg
2 tsp baking powder
1/2 tsp salt
 1 1/2 cups flour
3 medium sized peaches or 4 plums


Combine the sugar, milk, salt, oil and the egg well in a large bowl. 
 

 Add in the baking powder, salt, and flour. Mix this just until combined so the cake will stay tender. 


In a greased 9 inch cake pan arrange the peaches. If you like, you can peel your fruit but I am lazy and the peel doesn't bother me. If you don't have time to arrange them like this, they can just be thrown in however. 
 

Pour the cake batter over the fruit. and tap the pan a few times on the counter to get all the bubbles out. 
 

Bake the cake in a 350 degree oven until the top is browned and a cake tester comes out clean. This should take around 25 to 30 minutes. 


When you are ready to serve the cake, flip it over onto a plate to show the pretty arranged fruit. 
 

I like to serve this with a dollop of whipped cream and coffee. Enjoy!

Monday, July 8, 2013

Bacon and Veggie Quiche


When I was a kid I had a hard time sleeping. It is a normal phase of adolescents to have weird sleep patterns, and I was indeed apart of the norm. It was during this time I learned to love the late night infomercials and the silly things they would sell. They would all have the same format: a huge problem in everyone's lives would be presented (including a drama soaked dramatization) and a magical appliance would appear to help solve it. 

Several of the food storage and saving devices came to mind the other day when I went to make this quiche. The plan was to have broccoli swimming in a sea of tender and delicious eggs. My broccoli had become floppy and slimy, not so good with eggs. After rummaging around my veggie drawer, I found a sometimes forgotten vegetable. I figured zucchini would work just as well in a quiche and it was quite delicious! Choose the veggie you love most, and make sure to store your broccoli well and use it quickly.

Ingredients

6 eggs
1 medium zuchinni, chopped
4 slices of bacon, chopped (turkey or regular)
1 cup of cheese, graded


First, unfold a single pie crust into a pie plate. You can use your favorite frozen pie dough or find my favorite homemade recipe here.  Place the pie crust into the refrigerator to chill while you make the filling. Chilled pie crust bakes up way flakier.


 While the pie crust is chilling, crack six whole eggs into a bowl. Season them with salt and pepper to your liking. Then, whip these into a furry to make super fluffy eggs. My mom shared a secret for fluffy eggs: use a blender. I like to use my immersion blender but a regular whisk will do as well.


 Arrange the bacon and the zucchini in the chilled pie crust. I like to keep the bacon on top. It invites those who have questionable opinions about vegetables.


pour the whisked eggs over the pie crust. 


 Sprinkle the cheese over the egg mixture evenly.


 Bake the quiche at 350 degrees for about 40 to 50 minutes or until the top is golden and the center is set.


A slice of this delicious pie and a side salad would be perfect for any time of day!

Monday, July 1, 2013

4th of July Recipe Round Up


 It's here! The pinnacle of summer grilling! The 4th of July has always been one of my favorite holidays. Not only is is a great day of American celebration, it also means a day of delicious food. As a kid I knew it was officially summer when I would wake up and smell everyone's smokers and grills firing up for the evening celebrations. Today I am posting some of my favorite and most popular summer recipes to help you decide what to make this Independence Day.


Delicious and healthy Fruit Dip (most popular appetizer)


Fried Corn Salad (Most Popular Side)


I hope you try some of these and have a wonderful holiday!