Pages

Monday, December 30, 2013

 Green Chile Dip

 I hope you all had a wonderful Christmas, I know I did! This time of year is so special since we get to spend it with close friends and family. This year has been very kind to me and I am so glad I have great people to celebrate with. One of my favorite things to celebrate with is this dip.

 It's so delicious! Living in New Mexico, I had a dip like this on a few occasions and now I love to make it all the time. It's perfect on it's own with some chips or you can put it in burritos, nachos and even quesadillas. Not only is it a great addition to having chips and salsa, it is super easy to make. Try it out for your next party!


Ingredients

1 clove of garlic
1 tablespoon of oil
1 1/2 cups of chopped green chile
2 cups of plain sour cream
1 teaspoon of salt
1/2 teaspoon pepper


 Pour the oil into a small saucepan and add in the garlic clove. Then turn the burner to a low heat. When you start this process in a cold pan, the oil infuses with the garlic flavor. Allow the garlic to cook over the lowest heat possible for one to two minutes. Make sure this is not browning too much on the outside, as it will have an overly toasty and bitter flavor.


 Once the garlic has cooked for a few minutes, add in the green chile. I used one small container of the Guerrero frozen green chile after has been thawed. I like the hot flavor since it gets cooled down a bit by the sour cream. If you prefer mild, use either the mild frozen chile or even the canned vareity if you want. 


 Cook the green chile for a few minutes along with the whole garlic clove. The type of chile I use is frozen fresh so it needs a little of the crunch taken off before it can be put with the dip. 


Once the green chile is no longer crunchy, let it cool off for a bit.  I take out the garlic clove and smash it with a fork into little bits.


Once the green chile and garlic mixture has cooled a bit, stir it into the sour cream. Then add in the salt and pepper. I like to let this sit for a few hours so all the flavors meld, but if you need it in a pinch it will be delicious as well. Serve this with tortilla chips or even pepper slices for a delightful appetizer for your next get together!

Saturday, December 21, 2013

Christmas Cookies and Goodies

  Merry Christmas, everyone! One of the best parts of the holiday season is the amount and variety of goodies we get to enjoy. I love trying everyone's favorite recipes and tricks around the holidays. Here are a few recipes from Gingerlocks' Kitchen to make the season merry and bright!

Snicker Doodle Blondies 

Oatmeal Raisin Squares

Orange Chocolate Chip Pound Cake

Chocolate Peanut Goodies

Golden Christmas Truffles


Perfect Pie Crust

Dinosaur Cookies

Nutty Monkey Bread 


Triple Chip Nut Clusters

Perfect Ginger Cookies


I hope you try out and love some of these recipes this holiday season!

Monday, December 16, 2013


 Christmas Cooking and Cleaning Tips


 As the holidays come closer to us, the hustle and bustle of the season fast forwards a bit. Do you feel it? I was at the mall this weekend aimlessly wandering around for presents and I felt the panic in the air. There is a lot to do this time of year and it is great, but we can all use a little help from time to time. I hope these tips will help out with your cooking and cleaning tasks for the Christmas season!


First on my list of tips is how to clean copper. I have these pans that regularly need some love. I know they are old and terrible, but I just adore them. So on occasion I shine them up with an easy fix.


Take a lemon and cut it in half. Sprinkle liberally with table salt and scrub away at the copper. It doesn't take long to see that pretty, clean metal shine through.


Much better!


 Tip number two comes from my super smart mom! I really hate cleaning a strainer, but I would prefer to have the greased drained from ground meat. You can have both with an easy trick. Squish all the meat to one side and lift up one side of the pan to allow the grease to collect. Then spoon it out or use a paper towel to soak it up. I have even recently started putting the handle of my skillet over my teapot, it is the perfect height for this!


 My dear friend Julie consistently claims to be "not good at the whole domestic thing." She is really cute. She is also a liar. One day she brought over some leftover fresh peeled garlic for me to borrow.  Julie told me to keep it in the freezer and it works  perfectly all the time. She was right! Now I just peel a few bulbs at a time and keep the cloves frozen. When you are ready to use them, just pop them into whatever your cooking for a delicious addition.


One of my favorite tips comes from Linda at mykindofcooking. She posts awesome tips and recipes all the time! I really hate chopping bacon. It's slimy and wiggly and just not fun. One of her posts said to just cut the bacon with kitchen shears, it's perfect for big or little slices in a recipe!

I hope these help your holiday entertaining Come back for a visit  for some tasty Christmas treats!

Thursday, December 12, 2013


 Angel Food Cake with Cranberry Compote


 As promised I have a super easy holiday treat for you. It requires about 10 minutes, it's super delicious and beautiful! Christmas time is something I look forward to each year. I make myself wait to decorate and get out all of the things that make the season bright. It makes me one happy girl to smell pine trees and hear Christmas Carols.

 Then I realize how many different events I need to go to, how many presents I need to think about and shop for, how many cookies need to be made for everyone who is able to eat cookies, go look at lights in the freezing temperatures and heaven knows what else. Let's face it, Christmas is wonderful, but it is crazy busy! This fool proof dessert is a life saver and will make anyone feel the holiday spirit inside.

 Ingredients

1 package of fresh cranberries
1 1/2 cups sugar
3/4 cup Orange Marmalade
 1 prepared Angel Food Cake


Plop the whole package of the cranberries into a medium sauce pan. I rinsed my cranberries off a bit while they were still in the bag, so this may have added about a tablespoon of water or so. Turn the heat on the pan to medium low and put a lid over this.

You will hear some popping and nonsense going on. Don't be afraid, this is normal but be very careful as the cranberries will nearly burn you alive.
 

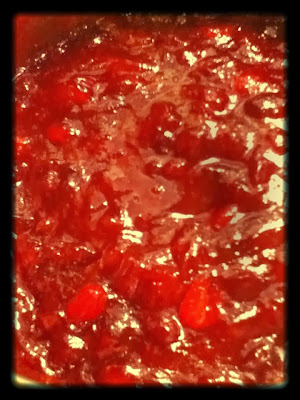
 Once the cranberries have had a bursting good time over the heat add in the sugar and marmalade. Turn the heat down to low.


Continue to cook the cranberries until they are hardly recognizable, about another 5 minutes. I like a good amount of cranberry texture to it, but if you do not, just keep cooking and stirring a while longer.
 

While the cranberries are doing their thing, slice up the angel food cake into large chunks. It's low fat, don't cheat people on the cake size.
 

I let the compote cool a bit before serving so it does not give people that nasty scalded tongue feel. Pour the cranberry goodness over the cake slices. This can be made ahead as well! Just keep the cake and compote separate and refrigerated until you are ready to serve.

Check back on Monday for some easy kitchen tips to make your holiday cooking easier!

Monday, December 9, 2013


 Italian Sausage Sandwiches With Homemade Buns


 These pictures are not very pretty. Being a good photographer is not something I would sign my name to for sure. This thought I had was confirmed this week when I found others thought the same. I followed a link that was creating some popular traffic to my blog. It was a Pinterest board titled "Worst Food Photography." I have to admit, it made me giggle a touch.

I frequently tell people who eat my food "It's not pretty, but it really does taste good." For the most part they agree with me on this. These sandwiches were one of those things. These pictures do this sandwich no sort of justice. They are even uglier in person, but they are crazy tasty. I start with my super easy Magic Bread recipe for the buns. Then I add in some good sausage, tomato sauce and plenty of cheese. It's the kind of sandwich that causes all kinds of goodness to drip to your elbows but you don't care because you really want to swim in it anyways. 

Ingredients
 Magic Bread dough, ready to be baked or store bought hoagie rolls
1 pound of spicy or sweet Italian sausage
1 jar of your favorite tomato sauce
2 cups mozzarella cheese, divided


If you are using the crazy easy Magic Bread recipe, make sure it has risen for at least 12 hours. Roll it around in some flour to get rid of most of the stickyness.
 

Divide the dough into four different balls. Roll them into little clouds of happiness by smoothing over the top and pinching the bottom part together. Preheat the pan in a 400 degree oven for about 20 to 30 minutes. Then throw them in the oven for about 30 minutes. Meanwhile, it is sauce time!


Brown the Italian sausage over medium heat until there is no pink left. Then add in the sauce and allow this to simmer.


Here is what the sauce looks like before you add in the cheese. Just let this hang out while the buns cook. The flavors really develop as this simmers.
 

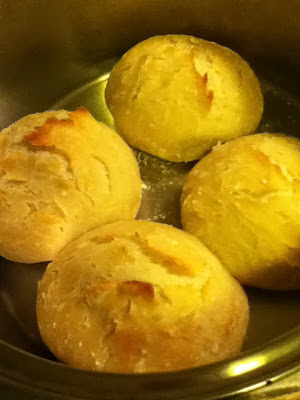
This is what the buns should look like when they are done. If you want them to be a bit more browned, just continue to bake them without the lid. I toast my buns before I make the sandwiches, so this is perfect for me. 


When the buns cool off enough for you to touch them, split them in half. 
 

Then place about 1/4 cup of the cheese on each top half. Put this back into the oven on an oven safe place to get melty and toasty. It should be plenty hot enough in there to melt this up nicely.


 While the cheese fairy is in your kitchen, go ahead and have her add the remaining cup to the sauce mixture. Make sure this is on low or else the cheese will get too stringy.


Pull the buns out when the cheese is melted and the bottom part of the bun is nice and toasted. This will ensure it absorbs plenty of the sauce.
 

 Spoon a good amount of the sausage and the sauce onto the bottom bun and top it with its cheesy hat.


Despite this sandwiches appearance it will give you a very beautiful feeling on your insides, I promise!


Stop by on Thursday for a crazy easy holiday dessert idea!

Monday, December 2, 2013


White Chocolate Cranberry Blondies


I love Christmas time! The smell of the trees, singing Christmas Carols for hours and a bit of decorating. Another good thing about the holidays is the return of some of my favorite cookies and baked goods. These blondies are so delicious. They are sweet with a bit of tart thrown in.

 Several years ago My aunt Jami brought these to Thanksgiving and I thought they were so tasty. I have adapted the recipe a bit to have a few less ingredients. Around the holidays I don't necessarily have time to measure out a whole bunch of extra ingredients. I am sure you will love this quick and easy recipe!

Ingredients

1/2 cup butter, softened
1 cup of sugar
2 eggs
3/4 teaspoon baking powder
1/2 teaspoon baking soda
1 cup flour
1 1/2 cups white chocolate chips (1 bag)
2 cups fresh cranberries

Cream the butter and the sugar together and make sure they are well combined. Then add the eggs, one at a time. Combine the remaining ingredients in a separate bowl and mix them well. Combining the white chocolate and cranberries with the flour helps them stay in the middle of the blondie rather than sinking to the bottom. 

Add the dry ingredients to the butter and sugar mixture. Stir this together just until combined. Pour the dough into a well greased 9 X 13 pan. Smooth out the cookie like dough so it is very even. Then bake this at 350 degrees for 30 to 40 minutes. You will know these are ready when a toothpick comes out almost clean. Make sure you don't over bake these, you want them to be ooey gooey good!