Pages

Monday, March 25, 2013

Magic Bread Pizza


I was in a waiting room the other day and I saw the cutest little boy. He was playing with a matchbox car, driving in on every surface he could find and figuring out all the things it could do. I have to admit, that is a little bit how I am with my magic bread recipe. It turns out it is not only super tasty and crusty bread, it's also easy to make pizza with it too. 

Typically pizza is an easier yeast dough to make since it only rises once, but I do like the idea of only having to know one recipe. My favorite part is there is no need to figure out what "lukewarm" water means or even dragging out a thermometer to make sure you don't kill the yeast. Just put the ingredients together and let them sit for 18 to 24 hours. As for the toppings, put on whatever you like and it will be perfect!

Ingredients

3 cups of flour
1/2 teaspoon of yeast
1 1/2 cups of  water
1/2 teaspoon of salt
flour for rolling out the dough
1/2 cup of tomato sauce
2 cups of Mozzarella Cheese 
1/3 of a cup of Parmesan Cheese 
1/2 teaspoon of Italian Seasoning
1/2 teaspoon of red pepper
 6 to 8 slices of Salami


Combine the first four ingredients and let them sit, covered at room temperature for 12 to 24 hours. After 24 hours you can keep it in the fridge or in the freezer. This recipe makes enough dough for two pizzas, and half of it can easily be frozen for a later day.

 Preheat the oven to 500 degrees when you begin rolling out the dough. Roll out half of the dough with the extra flour and a rolling pin. Make the dough fairly thin but not so thin it tears. I like to pick it up and stretch the dough out a little as well. 

I bake the pizzas on a regular cookie sheet but if you have a fancy pizza stone, by all means use it!


It should look like this when you are finished with the rolling process


Spread out the sauce over the dough


 Sprinkle over half of the cheeses and seasonings. I used fresh Mozzarella this, but just shredded will work nicely as well.


Place the Salami or other toppings over the first layer of cheese.


 Sprinkle over the remaining cheese and seasonings. I like to do this in two layers as sometimes the toppings will burn a little bit if they are directly on the top.


Bake the pizza at 500 degrees for about 10 to 15 minutes or until the top is bubbly and the crust is brown. I usually wait a few seconds for the cheese to set up before cutting into slices. 


Enjoy!


Thursday, March 21, 2013

 Hairy Cookies


Mom: "I thought of you today." I'm thinking she found a mess I made years ago or a cute holiday ornament of some kind. "I found a very long red hair of yours woven into my clothes. Isn't that weird? It's like your hair never moved out or something." It's true. I do shed a lot. That's not where the name for these cookies come from though. Not even a little bit. 

The strange name comes from the orange zest and coconut topping; it looks just like hair. These are probably one of my mom and I's favorite cookies. The cookie is so soft and cake like. The top part develops that sticky, gummy layer that really moist cakes get. Then it gets a layer of frosting and coconut with a hint of orange. Seriously, they are so good it's stupid.

I realize not everyone loves coconut. As shameful as that is, you can easily make these without the coconut topping. It makes the name a bit  more ridiculous but only mildly less delicious. If I am taking these somewhere, I'll make about half with and half without coconut to please everyone's dessert preferences.

 Ingredients

1/2 cup of vegetable oil
1 cup of sugar
1 cup of sour cream (plain yogurt works well, too)
1/2 tsp salt
2 eggs
1 teaspoon of vanilla extract
2 1/2 cups of flour
2 tsp baking powder
1/2 teaspoon baking soda
Cream Cheese Glaze (see below)
2 cups of coconut
zest from 3 oranges


 Combine the first six ingredients and mix them together well.


Then add in the remaining dry ingredients and mix just until it's combined. The dough should look like a really thick cake dough. Don't be tempted to add more flour, the dough is supposed to be super sticky.


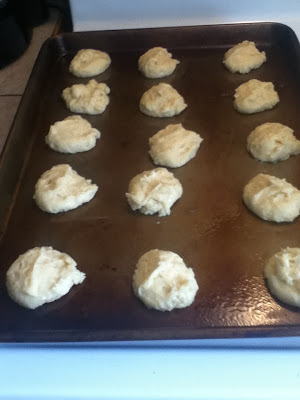
Spoon the dough onto a well greased cookie sheet. Try to spread them out pretty well, they do puff up a lot! Bake them at 350 degrees for about 10 minutes or just until the bottom of the cookies have browned slightly. 

While the cookies are baking, go ahead and assemble the cookie toppings. 

Cream Cheese Glaze

4 oz cream cheese, softened (1/2 package)
4 oz butter, softened
2 cups of powdered sugar
1 to 2 teaspoons orange juice
zest from one large orange

Combine the softened butter and cream cheese until they are well blended. Slowly add in the powdered sugar. I add the full 2 teaspoons of orange juice as I like the glaze a bit more runny. For a thicker consistency, just add a little less. Then add in the orange zest. 

Take the coconut and place it in a bowl and mix in the remaining orange zest.


 Time to assemble! This is how the cooled cookies should look. Make sure they are totally cooled before frosting.


Smooth over the frosting so it creates a thin layer. If you are making non hairy cookies, you can just stop here. 


Supreme deliciousness can be achieved with a sprinkle of the coconut and orange zest mixture. I do this over a plate and encourage the coconut to stay on with a squishing / pressing motion. Some will fall off, but you can easily dump the coconut remnants back into the bowl for the other cookies.

Store these in an airtight container in the refrigerator as soon as they are done receiving their hair. These cookies will spoil very quickly if left at room temperature.

Transporting them can be troublesome but there are a few different solutions. If you are able to plan ahead, you can freeze them in a single layer on a cookie sheet. Then, they can be stacked on top of one another in a large container. You can also place them in an airtight container with a layer of wax or parchment paper on top. Then continue to layer. 


Enjoy!

Monday, March 18, 2013


Crescent Mini Quiches


 For the majority of my life, breakfast foods have been one of my least favorite categories. Eggs weren't my thing as a kid and pancakes always make me hungry a few hours later. I have recently started to discover the error of my ways. One of the things that has helped me realize this is the goodness of quiche. I just don't get those happy pies can be so much better than regular eggs. It's mind boggling I tell you. Maybe it's the pie crust, maybe it's because it's baked in the oven, I can't tell you. What I do know is that these little mini quiches are little bites of brunch heaven.

The filling for your little quiches is up to you. I like a combination of meat and vegetables but anything you like will be perfect. Leftovers are great to use in these too; sauteed spinach or broccoli are perfect. This recipe serves about 4 people but it can easily be doubled.

Ingredients

1 can of large crescent rolls
1/2 lb bacon (I used turkey bacon) or sausage
1 bell pepper, chopped finely
8 eggs
1/4 cup milk
 1/2 teaspoon salt
1/2 teaspoon pepper
2 Tbs sour cream (optional)
1/2 cup of shredded cheese (I used medium cheddar)


Start by browning the bacon or sausage in a small skillet. Make sure it is cooked through, but not overly done. It will finish cooking in the oven. Add in the peppers and cook until they are slightly tender.


 While the bacon and peppers are cooking, roll out the crescent rolls big enough so they will fit well in a muffin pan. Make sure you spray the pan well with non stick spray before you squish all the dough in. I can rarely get crescents out of the can without tearing them apart, so I just combine the whole thing. Then I take off about 1 to 2 tablespoons of dough and roll it out thinly.


 Once the bacon is cooked and the dough cups are ready, crack the eggs into a bowl. Add in the salt, pepper, sour cream and milk. Then whip this up really well so it is light in color and fluffy. I like to use my immersion blender to add a lot of air into the eggs, but a good whisk or fork will work too.


 Preheat the oven to 350 degrees.


Fill the eggs with a few slices of bacon, then fill them 2/3 of the way full. Sprinkle in a few more slices of the bacon. Then add the cheese over the top.


Bake these at 350 degrees for about 20 to 30 minutes or until the tops are slightly browned and spring back when pressed. I like to serve these with a nice salad or fresh fruit. 


Thursday, March 14, 2013


 Thai Coconut Chicken and Noodles

 So there I was. In the prepared soup isle. It was a wee bit overwhelming to me. It is not a place I visit often. From what I hear on the daytime talk shows, it is this isle that causes sudden death from bad nutrition. I had never bought Ramen Noodles before. No really. Not even in college. It's not that I had never eaten or enjoyed them before. I didn;t even know what package they came in or how many you had to buy. Naturally, I bought the 12 pack and got out of the store ans quickly as I could.

I really like Thai food, but I was a little unsure of how to begin making it at home. The secret ingredient that makes it super easy is Thai Curry Paste. There are a few different types, but I really like the red curry. If you have never had curry before, this is a mild and easy way to try it while you get to adjust the spice level. This recipe is a mild to medium heat level. Spice scaredy cats will enjoy this one too!

 Ingredients

1 Tbs vegetable oil
1 oz Red Thai Curry Paste (half of a 1 ounce jar)
1 large can of coconut milk 
2 packages of Ramen Noodles 
4 cups of water
1/2 bag of frozen bell peppers
1 cup of cooked chicken, diced
red pepper flakes (optional)
Cilantro and limes for garnish (optional)


Heat the oil in a large saucepan over medium heat. Then add in the curry paste. Let this caramelize for a few minutes.


 Add in the coconut milk. Make extra sure you are not using coconut creme. Check the ingredients to make sure there isn't any sugar or anything extra in the coconut milk. Add in 4 cups of water.


Break up the two bricks of noodles and cook them in the soup until they are tender. Add in both seasoning packets as well as the cooked chicken. 


 Add in the peppers and cook until they are tender. Taste the soup and adjust it to your liking. I added a few red pepper flakes, cilantro and a squeeze of lime.


Enjoy!


Monday, March 11, 2013


 Tuna Melt Pasta


 I was recently at a diner and found myself spending a lot of extra time choosing what I wanted for lunch. This is a game I am terrible at. So many options leave me with so many opportunities to wonder if I ordered the wrong thing. I went with the safe option and ordered a tuna melt. It was definitely the wrong thing There were lots of things I wish I had ordered instead. 

When I think of a tuna melt, a creamy cheesy happy fish island comes to mind. This was not that. Not even a little bit. So I decided to take back the idea of a tuna melt and make it even better than I had hoped it would be that day. This is definitely creamy and cheesy.

This recipe is a macaroni and cheese recipe I adapted from the Martha Stewart Comfort Food cookbook. It is one of my favorite cookbooks. Evidence of this can be seen in the stained and almost torn out pages. The macaroni and cheese page is one that has stains a plenty. This recipe is quite different than the original, but it is the same general method. 

Ingredients

3 Tbs butter
1/4 cup flour
1 tsp salt
1/2 tsp pepper
1/4 tsp ground mustard
2 1/4 -2 1/2 cups milk, warmed
3 cups of cheese, grated ( I used 2 1/2 cups of medium cheddar and 1/2 cup Parmesan
1/2 lb short pasta, cooked (shells, macaroni, penne) 
1 can of white Albacore Tuna


 In a small saucepan, melt the butter until it begins to bubble.


 I let the butter brown for about 30 seconds and then dump in the flour. Stir the flour until it looks like a thick paste.


 Let the flour and butter cook for at least a minute. This shouldn't brown too much, but it does need to cook long enough to get the raw flour out.


 Add in the salt, pepper, and ground mustard. If you like, you can also add in some cayenne pepper, but I prefer it without.


 Add in the milk slowly, whisking as you combine it. Don't worry if it's lumpy, it will come back together. Whisk and cook the sauce until it bubbles slightly. This will create a thick sauce.


Once the sauce thickens, turn the heat down as low as it will go. Then, add in the cheeses. You can add whatever cheese combinations you like, just make sure at least half of it is a good melting cheese. Mozzarella and Cheddar are both good for melting. Sharper cheeses need some help melting, so make sure to pair them with a softer cheese. 


 Combine the sauce, tuna and the pasta together. I chose to use small shells, but any short cut pasta will work well. This can be served now and it will be very tasty. However, it will be even better if you bake it in the oven for a little bit!


Spray a medium sized casserole dish with non stick spray. Then load in all that cheesy pasta goodness. 


 Bake at 350 degrees for about 30 minutes or until it is bubbly in the center. I even put this under the broiler for a few minutes to create a nice crust.


 This is a very rich and heavy dish, but in a good way. I serve this with a large side of vegetables or salad to make it a more balanced meal.


Thursday, March 7, 2013


 Sweet and Sour Chicken


Have you ever noticed Chinese food made at home never tastes even close to those takeout containers? I have. It bothers me greatly. After this recipe, I am pretty sure it is a case of trying too hard. The only ingredient that really stand out to me in this recipe as "Asian" would be soy sauce. No amount of fancy fish or oyster sauce has come close to authentic takeout for. But this is different. 

Who knew ketchup and frying things would make Chinese food taste more authentic? I'm pretty sure that's called Texas logic. Regardless as to what kind of logic is used this is super sticky and just plain delicious. No really. Make this, and you will like it. 


Ingredients

2 lbs of chicken breast, cut into bite sized pieces
salt and pepper to taste
3/4 cup cornstarch
1/4 cup oil
1/2 sugar
1/4 cup honey
3 Tbs ketchup
1/2 cup vinegar ( I like apple cider vinegar)
3 Tbs soy sauce
1 Tbs chopped garlic


Start by heating the oil in a large skillet. Coat the chicken with salt and pepper. Then toss them around in the cornstarch until they are well coated. Make sure you shake off any excess as it will make the oil taste burnt. 


Fry the chicken in the oil until it is golden brown. Don't worry if it is not done, it will finish cooking in the oven. 


 If the bits of cornstarch start burning in the oil, you can take out the chicken and wipe it with a paper towel. While the chicken is cooking, combine the rest of the ingredients in a 
9 X 9 pan.


 When the chicken is browned, put it in the pan with the sauce. Stir this well so all the pieces are well coated.

Bake this in the oven at 325 degrees for about an hour. I stirred this every once in a while to fully coat it in the sauce. 


Serve this over rice and vegetables and enjoy your homemade takeout!


Monday, March 4, 2013

One Bowl Red Velvet Cake


Red Velvet cake is very popular theses days. From weddings to birthdays to the average bakery menu, red velvet has made a large spike in popularity as of late. I recently went to a birthday party and needed something to bring along. I had just cleaned the kitchen and felt no great desire to make it a disaster again. Hmmm... what to make?

I remembered a red velvet cake recipe that looked really good, but I had never made it before and it needed some changes. It seemed risky, but the party was right next to a grocery store. With a backup plan in mind I decided to take my chances and alter a new creation. The cake was very moist and delicious with the perfect amount of chocolaty goodness. Not to mention it can be made in one bowl for easy cleanup!

I used a cute new pan I got from Linda at Mykindofcooking.com for Christmas. The bake time will be the same for two 9 inch pans, but you will need to shorten it if you are making red velvet cupcakes.

Ingredients

1 1/2 cups sugar
2 eggs
1 1/2 cup vegetable oil
1 cup of plain yogurt
1 teaspoon vinegar 
1 teaspoon vanilla extract
1 teaspoon red food coloring
3 tablespoons cocoa powder
1 teaspoon baking soda
1 teaspoon salt
2 1/2 cups flour


Combine all the ingredients together mixing well after the addition of each thing. Mix the flour in 3 batches and be sure to not over mix.

Bake in a pan of your choice for about 30 to 50 minutes  in a 350 degree oven until the edges are browned and a cake tester comes out clean when tested in the center.


Frost the cake with cream cheese frosting once the cake has cooled completely.

Cream Cheese Frosting

1 8 oz package of cream cheese, softened
1 stick of butter, softened
1 /2 teaspoon vanilla
4 cups of powdered sugar

Blend the first three ingredients together with an electric mixer until they are light and fluffy, about 1 minute. Then carefully add the powdered sugar and continue mixing for another minute or so. Frost the cake when it is completely cooled.