Pages

Tuesday, October 29, 2013


 Perfect Ginger Cookies


When people find out I have a food blog, they always ask the same question: "What type of food theme is it?" This question causes me to stare blankly at them waiting for an answer to come to me. This silly little blog has been up for about a year and I am still unable to answer this. "Food I like to eat?" I tell them questioningly, hoping it is enough of a legitimate answer to pacify them. The truth is, I have no idea. I really like cooking, eating, sharing, reminiscing, thinking  and talking about food. That is really the main reason for this whole thing. If anyone has a good way of describing what that theme is I am all ears. 

I was asked a new question the other day.  "So does everything you make have ginger in it?" That is obviously an easy question to answer. I think there has been only one recipe posted with ginger even in it. To be completely honest, I am picky about my ginger usage. It shows its best ability in desserts. Case in point: ginger cookies. This is a recipe I have modified from the Barefoot Contessa to make it a bit easier and uses a few less ingredients. These cookies are spicy, chewy and just perfectly toothsome. 

Ingredients

1 cup of brown sugar
1/4 cup oil
1/3 cup molasses 
1 egg
1 cup chopped crystallized ginger
2 1/4 cup flour
1 teaspoon baking soda
2 teaspoons apple or pumpkin pie spice


 Combine all of the wet ingredients and mix them well. You may think that just 1/4 cup of oil is not enough, trust me these cookies will be perfect!


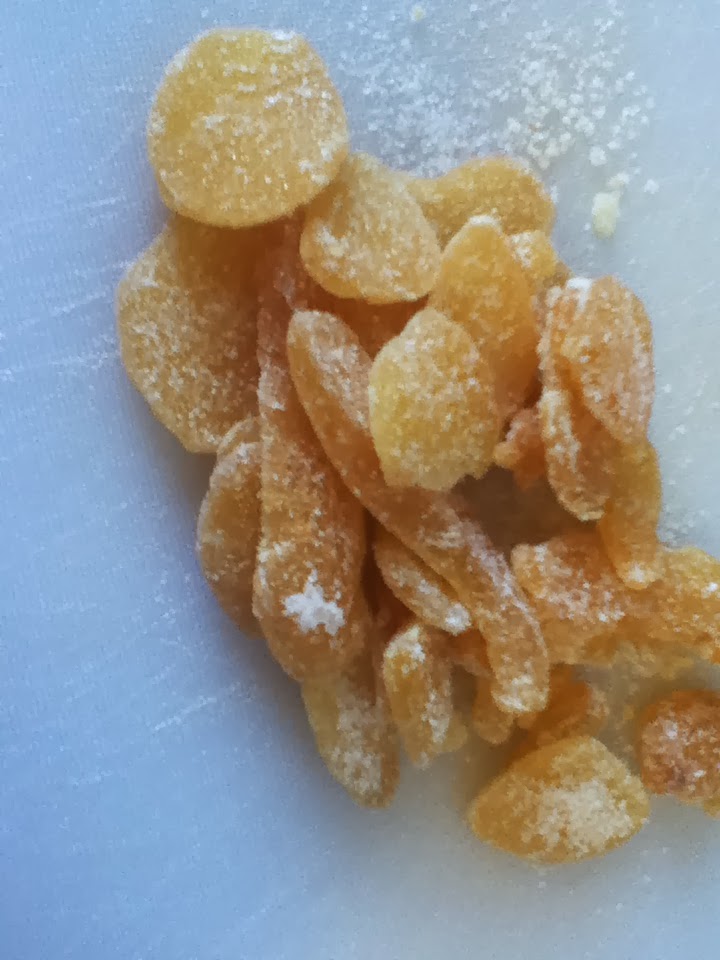
There are two types of crystillized ginger, wet and dry. This is the type you need. I have found this in a few different places. You can get this in itty bitty jars for about seven dollars. Don't get that kind. I have had pretty good luck in the dried fruit section, as well as stores that sell things in bulk bins. Just a scoop should do you for these cookies.


Chop up the crystalized ginger. This is was makes the cookies so spicy, so make sure they are in little bits. You could certainly leave this out of you are not as big of a ginger fan, but it does add a nice warmth to the cookie. After you stir in the ginger, add the remaining dry ingredients.
 

Roll the combined dough into tablespoon sized balls and bake them on a greased cookie sheet in a 350 degree oven for bout 8 to 10 minutes. Make sure these are not over baked, they are not nearly as tasty. 
 

These are really tasty with coffee or milk, even with ginger tea!

Thursday, October 24, 2013

Chicken Chile Baked Potatoes


 " Is this going on the blog?" This is a question I get pretty frequently when I feed people. Typically, the answer is no. Many of the things I love are just really simple and in my opinion boring. Some of the stuff would make me feel like a phony putting it out there for people to read and acting like it is a recipe they would even need to write down. 

"This should go on the blog." My fiance says that about everything I make. Sometimes I want to make him something really terrible and see if he still makes the same remarks. I'm pretty sure he would. After some urging, I decided maybe he was right about this one. It is really, really good and you can have an amazing dinner in 15 minutes. 

Ingredients

4 potaotes, scrubbed very clean
2 to 3 cups of cooked chicken, cubed
1 cup of red chile sauce
1 teaspoon garlic salt
1 cup of cheese

Start by baking the potatoes. If I have time I do love to do them in the oven at 350 degrees for about an hour.  The skin is so crisp and tasty. However, time is not usually on my side so the microwave is my regular method.Just throw them in the microwave for about 8 minutes or until a fork comes out easily.


While your potatoes are getting themselves ready, heat up with chicken and sauce. Add in the garlic salt. I sometimes add a little cheese to this to make it extra tasty.Let this simmer for about 5 minutes until the chicken has absorbed the sauce.

When you are ready to serve, split the potatoes open and season them to your liking. Just salt and pepper is my favorite, but you could even add a little taco seasoning. Then pour the chicken and sauce over the potatoes. Sprinkle the top with cheese and serve with a nice veggie on the side. Not bad for 15 minutes!

Monday, October 21, 2013

Pumpkin Bars


"Guess what time it is?" My sweet fiance doesn't really like this game. It usually involves him fixing something or me squishing his face. Which explains his apprehensive response "ummm noon?" "No, it's PUMPKIN TIME!" Silly, he should have known by the 10 cans of pumpkin sitting on the table. Pumpkin is one of my favorite things in the entire world. It goes with all the best fall spices and pumpkins have a natural resemblance to my own head. Or is it the other way around?

Either way pumpkin season is upon us and I am thrilled about it. Colder weather is not usually my favorite, but if I get to seasonably eat some pumpkin goodies I will consider myself appeased. Pumpkin delight number one are these little beauties. Pumpkin bars are happier than leaves falling off the trees.These bars are crazy moist and full of flavor. I spread a light layer of icing on them to force the candy corn pumpkins to become friends with the bars. If you would rather not have the icing on there, I did the hard work of I testing plenty of them naked and they are also crazy good. Science will thank me for it, I'm sure.

Ingredients

Bars:
1 (15-ounce) can unsweetened pumpkin
1 cup canola oil
3 cups sugar
3 large eggs
3 1/2 cups all-purpose flour
2 teaspoons baking soda
1 teaspoon baking powder 
1 teaspoon pumpkin or apple pie spice
1 teaspoon cinnamon

Icing:
4 Tablespoons of butter, softened
2 cups powdered sugar
2 teaspoons vanilla
1/2 teaspoon cinnamon
candy corn pumpkins, optional

Combine the first four ingredients in a large mixing bowl. Make sure everything is well blended. Combine the remaining dry ingredients in a separate bowl and mix those well. Usually I am not the "let's dirty another bowl" type of person, but the spices don't blend as well if you just throw them in. 

Pour the batter into a well greased cookie sheet that has fairly high sides. I have a few super deep pans so I was able to fill it about 3/4 of the way up. This recipe will give you about two pans full of the batter. Just to be on the safe side, I put another pan at the bottom of the oven to catch any batter that may explode over. Bake these at 350 degrees for about 20 to 30 minutes. Cool before frosting.

While the bars are baking, combine all the icing ingredients and whisk them until there are no lumps in it. If you like a thicker icing, add a bit more powdered sugar. Spoon this over the cooled bars and cut them into small squares. Then add any decorative flair you like. I like the little candy corn pumpkins, it makes them look like a little pumpkin patch!

This is a recipe adapted from /http://sugarmamacooks.com/. Head on over to her site, she has some amazing pumpkin wisdom to share!


Thursday, October 17, 2013


 Bruschetta Dip


 Homegrown tomatoes are probably one of my favorite things in the whole world. I frequently say "I could eat a whole acre of fresh tomatoes." I have never tried it, but it's probably true.
Knowing this you could only imagine my delight when I got a huge bag of tomatoes from my parent’s sweet neighbors. 
The whole way home I imagined all the yummy things these tomatoes could be transformed into. In my mind I saw myself grilling perfectly sliced French bread, slathering each one with garlic infused oil and topping them perfectly with a delicious tomato mixture. 

Fast forward to 20 minutes before a gaggle of girls descends upon my apartment.  My vision was a bit more appropriate for a summer in Tuscany than real life.  There was no time to grill or slather bread, but I couldn’t pass up the chance on using those shiny, ruby spheres of joy. 

As I chopped the tomatoes, I remembered a delightful brick of cream cheese in my fridge just begging to be used. One of my favorite appetizers is spreading jalapeno jelly over cream cheese and serving it up with a few crackers. I figured this whole concept could be applied to the tomatoes. Luckily I had a good cracker to serve these with as well. It was crazy delicious! The ladies loved it and so did I. So much so I even made more to for lunch the next day.


Ingredients

6 average sized tomatoes, diced
1/2 teaspoon salt and pepper
1/3 cup Italian Salad Dressing
1 tablespoon chopped basil
1 8oz brick cream cheese, softened
assorted crackers (I used Rosemary and Garlic flavored)
 

Combine all the ingredients before the cream cheese and crackers. Let this sit for about 15 minutes to let the flavors meld. 


If your cream cheese is not room temperature, throw it in your microwave for a minute on defrost and it should be perfectly smushy. Once it's the perfect temperature, put it into a pretty serving dish that is deep enough to house all that delicious tomato mixture.
 

Pour the tomatoe mixture over the cream cheese and serve this with crackers. I really loved this at room temperature or slightly chilled. Try this out, you will love it!

Monday, October 14, 2013

 Triple Chip Nut Clusters


"Ms. Little, you look kind of...bad." I have such sweet children, don't I? He was right, I did look terrible, but it was no where near the level of terrible I felt. Those of you who check this silly blog with some regularity probably noticed I have not posted in quite some time. The main culprit for my absence has not been a vacation in the Caribbean or shopping sprees lasting days. Instead it was super awful pneumonia. 

What started as a mild case of the yuck yucks ended up causing the most adorable hacking cough and super high fever that lasted for weeks. Despite my hatred of going to the doctor, it was needed. I am glad I did as it would have led to a few days in the hospital and eating green jello. No one likes that kind.

 There was one silver lining surrounding my moment of illness. I was still able to eat just fine. I'm pretty sure I know the cure to any sickness: chocolate! These are crazy good and fairly easy. Sorry there is not more pictures in the process, My kitchen was embarrassingly messy. You're a bright cook, I think you can figure out what spooning ooey gooey chocolate onto wax paper looks like.  I won't even tell if a few spoonfuls go missing.

Ingredients

3/4 cup semi sweet chocolate chips
3/4 cup white chocolate chips
3/4 cup butterscotch chips
1/4 cup butter or margarine
3/4 cup chopped almonds or pecans


First, just admire the chips. It's a bowl of beauty! These need to be melted and smooth. I do this in the microwave for 20 to 30 seconds at a time and stir after each cooktime
. Stop before they are totally melted or the mixture will get grey, lumpy and gross.


Once the chips are mostly melted, add in the butter and the chopped almonds. I'm pretty sure I could do a fine job of swimming through this if I were a much, much smaller person.


 After the mixture has been tested for quality, spoon about two to three tablespoons of the mixture in mounds on wax paper. If you need these to be ready in a pinch, throw them on a sheet pan into the freezer. They will harden in no time!