Pages

Thursday, January 31, 2013


 Creamsicle Poke Cake


There's something so nostalgic about a creamsicle. The flavor always reminds me of being a kid. I loved hearing the ice cream man coming to the neighborhood and scurrying to find any loose change in my room.  This cake has all the wonderful flavors of a creamsicle with a crazy moist cake along for the ride. I love poke cakes and how well they absorb all the moisture and flavor. This is one of my favorite desserts to make when I'm not sure what to bring, it's always a big hit!

 For this cake you will need:
1 yellow box cake mix and all the ingredients to make it
1 can of orange juice concentrate
2 small cans of sweetened condensed milk
2 teaspoons of vanilla
1 small tub of whipped topping


Start by baking the cake according to the box's directions.  Or if you feel super ambitious, bake your own yellow cake.


 While the cake is baking, combine the melted orange juice concentrate, cans of milk, and vanilla together until very well combined.


While the cake is still warm, poke the cake with the end of a wooden spoon or spatula. It may look like a Texas Chainsaw cake murder scene, but no worries it's supposed to look this way.


Slowly pour the milk and orange juice mixture over the cake. It may take some time for it to soak in. I poke a few more holes in at this point to encourage the cake to drink in the creamsicle elixer. It's for its own good!


 Smooth the whipped topping over the top and refrigerate overnight.


 This is delicious alone or served alongside some vanilla ice cream. 
Enjoy!


Monday, January 28, 2013

 Tomato Soup Bread Bowls


Over the holidays I went on a tremendously fabulous trip to San Francisco. I ate, ate, and ate my way through the city and experienced many different delicious dishes.  One of the things San Francisco is known for is their sourdough bread bowls filled with steamy soup. While my magic bread recipe is not sourdough, it does make a nesting place for soup. My favorite soup in a bread bowl is tomato and I love it with my creamy tomato soup recipe.

To make these awesome bread bowls just follow my magic bread recipe, but split the dough into four small balls and bake them for about 30 minutes instead of 45. You will still need to preheat the pan before you bake them.


Once the bread has baked, cut a small hole in the top being careful not to cut the bread all the way through. Then, if your oven is still hot put it back in until the inside of the bread bowl is toasted. If you are not making the bread bowls right away, a toaster oven works really well.


Once the bread is toasty and crisp, fill it with your favorite soup. Try out my creamy tomato soup. It's rich and delicious and goes well with the bread. Top the soup with a sprinkle of cheese and a few croutons.


It may not be the same as Boudin's bakery, but it's a nice way to keep memories!


Thursday, January 24, 2013


 Easy Chicken Tortilla Soup 


Colorado is experiencing a welcomed heatwave after a spell of really terrible, no good, horribly cold weather. It was supposed to be a nice and toasty 70 degrees today. It may have been that warm for a few moments but it quickly got chilly once again. Before I had a chance to close up my theoretical beach umbrella in an angry huff, I remembered I had some left over chicken tortilla soup in the freezer waiting for me. 

This is a very easy and flavorful soup to make. I like to use tortilla chips rather than regular corn tortillas. It may all be in my mind but I feel like the chips soak up the soup a little faster and adds an extra salty fried crunch. Salty and fried. Need I say more?

Ingredients:
1 tablespoon of oil
1/2 red onion
1 jalapeno
1 bell pepper (I used red but any color will work)
1/2 lb chicken breast (1 large or 2 small)
1 14 oz can black beans
1 14 oz can diced tomatoes
2 boullion cubes 
1/2 cup tortilla chip crumbs
Condiments like cheese, sour cream, and extra chips 

First,  chop the onion, jalapeno, and red pepper. Add the oil to a saucepan over medium heat. Add salt and pepper to this mixture. 

Season the chicken and add it to the pan. You can take the veggies out of the pan to cook the chicken, but I just squish them to the side and let the chicken cook in the center.Once the chicken is no longer pink, add the beans and tomatoes. Fill both of these cans about half way with water and add that to the pan as well.

 Add in the bouillon cubes and let the mixture come up to a boil. Simmer the soup for about 15 minutes. Add the tortilla chip crumbs to the mixture and let this simmer for about  5 more minutes.

Once the mixture has thickened up serve with the condiments and enjoy!

Monday, January 21, 2013


Orange Chocolate Chip Pound Cake


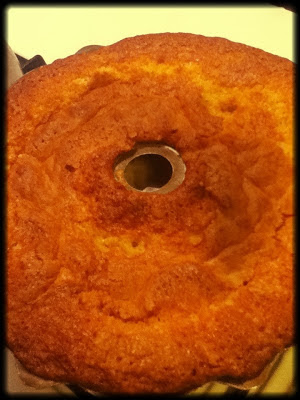
It was my sweet mom's birthday last week and I decided she needed a birthday cake. Not a cake covered in creepy colored icing, but a super moist and delicious one. My mom has always loved white cake and I decided this pound cake would be a perfect idea with a twist. Orange extract and chocolate chips make a great addition to this basic cake recipe and has an extra special touch. I adapted this recipe from Paula Deen's pound cake recipe. I added orange and chocolate but also cut back a bit on the sugar. With the chocolate makes it a bit overly sweet, but usually I add a full 3 cups of sugar to this recipe if I'm not adding anything to it.

1/2 teaspoon baking powder
1/2 teaspoon fine salt
5   eggs
3 cup all-purpose flour, plus more for pan
2 1/2 cups sugar
1/2 cup vegetable shortening
1/2 lb (2 sticks) butter, plus more for pan
1 cup milk
1 teaspoon orange extract 
1 1/2 cups semi sweet chocolate chips

First, combine the shortening, butter and sugar in a large mixing bowl. No really, you will need a super big bowl in the end. Mix until it is light and fluffy.


Then, Add the eggs in one at a time and mixing well after each egg.


In a separate bowl, mix the dry ingredients together.


 Add about one third of the dry ingredients to the butter and sugar mixture. Then add about a third of the milk. Continue this pattern, but end with the flour mixture.


 Butter and flour a bundt pan well. At least that's what Paula said would prevent the cake from sticking. She lied this time. My bundt pan works best when you only spray oil in it. Or this is just the lie I tell myself.


 Bake the cake for about 1 1/2 hours at 350 degrees or until a cake tester comes out clean


Hopefully your cake will come out of the pan much easier than mine did. If it does not, you can just cut it out of the pan and serve it into slices that way. This is delicious plain or with vanilla ice cream.


Enjoy!

Thursday, January 17, 2013

 Asian Peanut Slaw


"Ms. Little, What did you have for lunch?" I have this same conversation with a sixth grader every day when I pick my youngest bunch up from lunch. She usually grows tired of my "peanut butter and jelly" response. Today was a bit different. I told her I had this delicious Asian Peanut Slaw. She was surprised but a little confused. Slaw is not one of our vocabulary words, you see.  She told me I should put it on "that internet thing we know you do."  So, here it is.

This is a super easy and delicious meal to make. I like to add chicken to it or you can serve it as a side dish. You can serve it right away, but it won't be nearly as flavorful as it would be if you let it sit overnight. I really like this for picnics because it doesn't need refridgeration for a while. To try this out yourself you will need:

 
1/3 cup of rice vinegar
1/4 cup creamy peanut butter
4 tablespoons soy sauce
2 tablespoons brown sugar
1 tablespoon pineapple juice concentrate (orange juice also works)
1 teaspoon of sesame oil
 5 cups of shredded green cabbage (1/2 head)
2 cups shredded red cabbage (1/4 head)
3 carrots shredded or diced
2 green onions
1/4 cup cilantro (optional)
1/2 cup chopped peanuts

 
Mix the first six ingredients together. I had to warm up my peanut butter for a few seconds in the microwave to encourage it to combine.


Then combine the dressing with the remaining ingredients


Combine all the ingredients and let them sit for at least 3 or 4 hours. did I also mention this is super healthy? You should know that it really is.  I hope you try this out for your lunch soon!


Thursday, January 10, 2013


 Easy Fruit Muffins


 One of my favorite things about the changing seasons is the fashions and flavors that go with them. I love when magazines have the basic things you wear for the season and all the different combinations you can make between them. What I love about these muffins is very similar. I make these muffins year round but put different fruit fillings in depending on the season. Regardless of the time of year, my favorite is pumpkin, but there are so many possibilities. Not only is this a great basic recipe, they are also fairly healthy. 

For these easy muffins you will need:
1/2 cup rolled oats
1/2 cup milk
1/2 cup oil
1 egg
1/2 cup sugar
1 15 oz can of pumpkin, apple sauce, crushed pineapple or wet fruit of your choice
1 3/4 cup flour ( I use half all purpose and half whole wheat)
2 tsp baking powder
1/2 teaspoon baking soda
1/2 teaspoon salt

Combine the oats and milk. Let this set for about 10 minutes.
 

Add the remaining wet ingredients. If you use pie filling like lemon or cherry reduce the sugar to 1/4 cup. Make sure the wet ingredients are well mixed before you add the dry ingredients.


Put the batter into greased muffin cups. This recipe should make about 12 average sized muffins.


 Bake the muffins for about 30 minutes at 350 degrees or until a fork comes out of them cleanly.


Monday, January 7, 2013


Chile BBQ Chicken


Not all things are created equal. In terms of chicken, I mean. Advertisers boast about their meals including "all white meat" but I have to say it's definitely not my preference.I would have to say bone in chicken thighs are by far my favorite part of the chicken. There is no doubt about the convenience and ease of a chicken breast but it will never be as tender and juicy as the thigh.

For this recipe you can use any part of the chicken you wish. Chicken breasts would work beautifully in this delicious sauce. I used chicken thighs, and I removed the skin before I put it in the slow cooker. I find when I leave the skin on in slow cooker recipes, it gets a tad too greasy for me.

This dish is so simple and delicious. There is very little prep and it tastes like a  complex and time consuming sauce. If you like things spicier, feel free to add more heat to this to adjust your preferences. To make it a bit more mild, just use the hot sauce and chile powder. It may look like a lot of hot sauce, but I promise it won't be too spicy.

Gather up the following:
1 cup of BBQ sauce ( any you like will be fine)
1/4 - 1/2 cup hot sauce (Tapatio, Frank's Red Hot, or any other hot sauce you have)
1 cup of water
2 tbs chile powder
1 tbs ground chile or 1 teaspoon cayenne pepper (optional)
 1 lb of chicken breasts or thighs

 Combine all the sauce ingredients in the slow cooker and stir well. Then add the chicken and turn it over to coat them with sauce.


 Turn the slow cooker to low for 6 to 8 hours. This is a very low maintenance dish, if you won't be home to take the chicken out or turn it off, no worries.Once the chicken pulls apart easily, take it out of the slow cooker and shred or cube it into small pieces.


Add the chicken back to the sauce and turn the slow cooker to high with the lid off for the last half hour. This will make the sauce concentrate and become sticky and delicious.


Serve this over white or Spanish Rice with an extra spoonful or two of the sauce over the top. 


Thursday, January 3, 2013


Easy Apple Cobbler


Happy New Year! I love the holidays but there does come a bit of guilt  for me.This time of year always makes me feel like the bad guy. Everyone is off committing to their resolutions to eat healthier and exercise more and I'm the person shoving baked goods into their conscience. I don't mean to be the tempter, I just don't do the whole New Year's resolution thing. It's not that I find anything wrong with it, I just find it to be a bit of a set up for failure. 

If you watch the people who create these unrealistic resolutions they tend to go in a pattern. Everything is all alfalfa sprouts and tofu through January, but by Valentines Day they have a continent of candy half eaten before noon. I am by no means putting others down for trying to create good habits, but I think moderation overall is a good rule of thumb.

This recipe is a good example of moderation in portion at the very least. This is a half recipe, but it is very easy to double it if you need to. By only making a small amount it is a very realistic amount to share with a friend or two. Not to mention it is super easy and creates very few dishes.

For the recipe you will need:

Fruit Filling
2 large apples
1 tbs lemon juice
1 tbs flour
1/4 cup sugar
1 teaspoon cinnamon  

Cobbler
1/4 cup butter (1/2 stick)
1/2 cup milk
1/2 cup sugar
1 teaspoon baking powder
1/2 cup flour
                        
 First, put the butter and milk for the cobbler ingredients into an oven at 350 to allow it to melt


I used Gala apples for this, but you can use whatever you like or have on hand.


Peel and chop both of the apples until they are a bit smaller than bite sized. 


 Don't feel like it has to be perfect, it will get all gooey in the cobbler anyways.


Then add in the remaining fruit filling ingredients to the apples. If you do not have lemon juice, you can use orange juice or even lemon lime soda will do in a pinch. Mix this really well


By now the butter and milk should be melted together. If you add the milk at room temperature to the butter it will seize up and be very difficult to deal with.  Go ahead and add the remaining cobbler ingredients.


 Stir, stir, stir. No worries if it is lumpy, it will all bake out. Just make sure you ingredients are well mixed.


 Add the apples on top of the cobbler mixture. Mine was too full and spilled over a little. If yours is also like this then put a baking sheet underneath it to catch all the boil over. This may feel a little backwards, but the cobbler mixture rises to the top to make a delectable sticky topped dessert. Trust me.


Bake this at 350 for about 20 to 30 minutes or until the top is browned and set up. 


This is delicious served with vanilla ice cream or even a drizzle of caramel ice cream topping if you wanted to add something extra to this. Regardless of how you present it, I hope you love it!